This post may contain affiliate links.
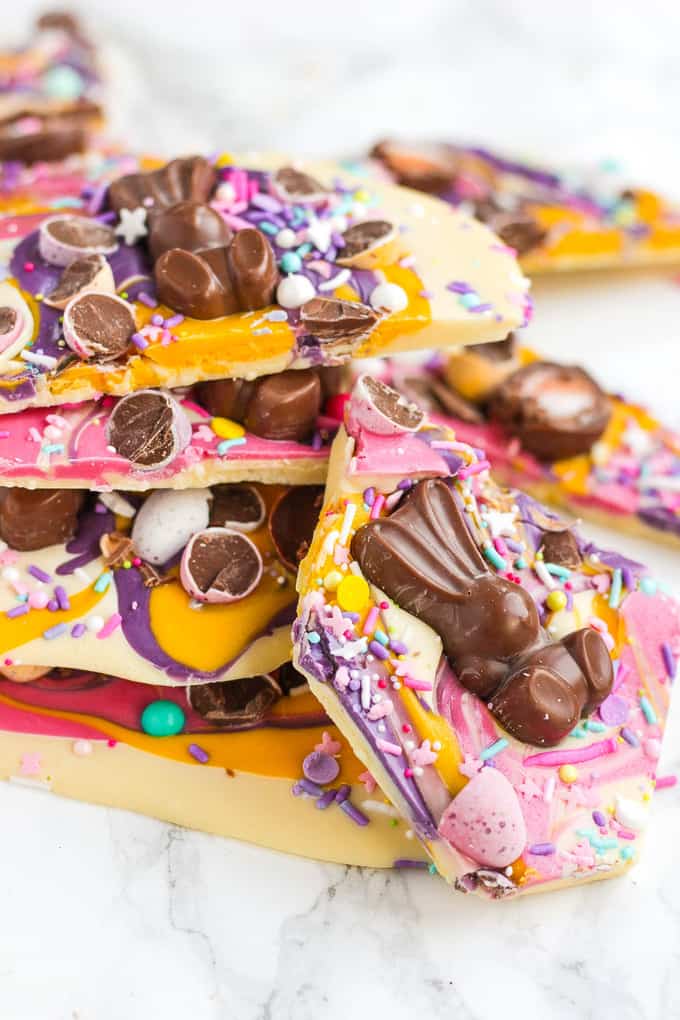
If you’re looking to make a little homemade chocolatey Easter treat, look no further than this show stopping Easter Chocolate Bark recipe. It’s super simple to make and impressive to look at, with its bright colours and toppings of mini eggs, creme eggs, chocolate bunnies and sprinkles. It’s also no-bake, meaning zero faff, just loads of fun!
I’ve said it before and I’ll say it again… I bloomin’ LOVE Easter. It involves all the good things about celebrations (time with loved ones and delicious food), without any of the pressures of present buying, pleasing everyone and rushing around.
Whether you’re religious or not, that feeling of spring in the air and brighter days just around the corner is always so wonderful.
I find this is the time to really enjoy making some extra homemade Easter chocolates and treats, simply because of that lack of stress.
With this colourful work-of-art Easter Bunny Bark, we’re going back to ‘baking’ basics (as in, not baking at all).
This is a fantastic recipe to make with kids because of the simplicity, vibrancy and fun (plus it doesn’t take very long so short attention spans don’t matter!)
Why you’ll love this Easter Bark recipe
⭐️ Colourful and fun
⭐️ Homemade Easter chocolate can be a nice gift
⭐️ Super simple, no bake, no faff

What is Easter Bark?
It’s an Easter chocolate slab that involves different types of chocolate being swirled together to make a bright, festive pattern and burst of colour, which is set in the fridge as one piece and can be broken up into smaller bits to eat.
It can be customised with different bits of chocolates and sweets embedded into the chocolate slab before it is set, which is where the significance of the word ‘bark’ comes from. As in, tree bark.
In this recipe we use a few different colours of chocolate (called ‘candy melts’) and Cadbury’s Creme Eggs, Mini Eggs and Mini Malteser Bunnies, as well as a few sprinkles for good measure. You can design your own with whatever you like though.
If you like this one, you might like my Date Bark recipe too!
Easter Bark Ingredients
- White chocolate – For the slab base
- Candy melts – I have used pink, yellow and purple ones (available on Amazon)
- Mixed treats – Such as mini eggs etc
- Sprinkles or decorations
How to make Easter Bark
- Gently melt the chocolate and candy melts separately and then pour it out onto baking parchment into a rectangle, and swirl everything up with a knife.
- Top with chocolate treats and sprinkles.
- Chill in the fridge until very firm (about 2 hours).
- Cut with a knife and serve it in shards (like you would an Easter egg).
Top Tips
Melting the chocolate
Be very careful to melt all of the chocolate/candy melts slowly in a heatproof bowl resting over a pan of just-bubbling water. Make sure the bowl isn’t touching the water.
Candy melts
If you’re finding they’re a little too thick, add a few drops of cooking vegetable oil to thin them out a bit. I use these ones.
Batch-buying chocolate
If you’re a regular baker or treat-maker, it’s so worth buying good quality chocolate in bulk like I do. I use Callebut Chocolate from Amazon, and it works out about the same price gram-for-gram as regular chocolate. You can really tell the difference.
Pouring it out
Be sure to pour the chocolate onto baking parchment so the bark peels off easily.
Turn it into an Easter gift
You could break up the bark once it’s set and package some up in pretty cellophane bags with a ribbon.
Let me know how you got on and what you thought of these recipes. Please rate the recipe using the ⭐️ below.
Also I’d LOVE to see your cooking creations. If you’d like to share yours with me, you can tag me on Instagram (@tamingtwins).

Chocolate Easter Bark {with Malteser Bunnies}
Ingredients
- 750 g (1.6 lb) White chocolate
- 150 g (5 oz) Pink candy melt
- 150 g (5 oz) Yellow candy melt
- 150 g (5 oz) Purple candy melt
- 250 g (9 oz) Mixed chocolate treats, I used Cadburys Creme Eggs, Mini Eggs and Mini Malteser Bunnies
- 30 g (1 oz) Sprinkles
Instructions
- Gently melt the chocolate and candy melts separately.
- Pour onto baking parchment and swirl with a knife.
- Top with the chocolate treats and sprinkles.
- Chill until very firm (about 2 hours).
- Cut with a sharp knife and serve in shards.
Did you make this recipe? Click here to let us know how it went and give it a ⭐️ rating! Your feedback helps us to make more recipes you really want.
Notes
Nutrition
Nutrition information is automatically calculated, so should only be used as an approximation. Nutritional values are per portion unless otherwise stated.
This post was originally published on February 2, 2017 and updated later to make improvements.


Looks so yummy!! I want to try some of this recipe! I need to teach myself to make this. It looks amazing!!!