This post may contain affiliate links.
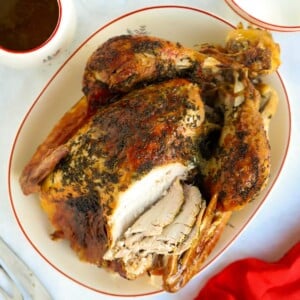
Here it is! The centrepiece, the main event, the traditional classic Christmas turkey. If the thought of cooking a big bird for the big day is causing you stress, never fear, everything you need is here!
This is your ultimate guide to how to cook a Christmas turkey without the fuss. I’ll hold your hand through the process and show you it doesn’t have to be stressful at all. Forewarned is forearmed – get those Christmas tunes on and enjoy your day. We’ve got this!
Hosting Christmas dinner can be daunting and the weight of expectation of getting everything just right on a special day can be a tad overwhelming.
Then there’s knowing how to cook a Christmas turkey – a large bird with a reputation for drying out that we don’t make the rest of the year… pressure much?!
Well, I am here to tell you that roast turkey does NOT have to be complicated or stressful in order to be delicious, cooked on time, and actually cooked all the way through!
THIS is how you serve up your roast turkey with zero fuss. This post will take you through everything, from how to prepare ahead, patting the bird dry to buttering and basting.
If you don’t take away anything else from this guide, please do two things:
- Make a flavoured butter and lather it under the turkey’s skin – this will keep it nice and moist (sorry about using that word!) No dry meat on the Christmas dinner table.
- Buy a meat thermometer – this takes the guesswork out of timings and takes the risk of overcooking away.
Why you’ll love this Christmas turkey recipe
⭐️ No fuss, no unnecessary frills, no drama
⭐️ Delicious, juicy and flavour-packed
⭐️ It’s the taste of CHRIIIIIISTMAAAAS!
I followed this method for a Turkey crown and the result was fantastic. The most delicious and succulent Turkey we have ever eaten. Thank you Sarah! This will definitely be my ‘go to’ method for cooking Turkey in future.
A SIMPLE GUIDE TO PERFECTING YOUR TURKEY
Crown or whole bird?
Essentially you’re cooking the same thing here. I’ll go into more detail about whether to choose a turkey crown or the whole thing further down, but it doesn’t change a great deal about the way in which to cook it.
Flavoured butter
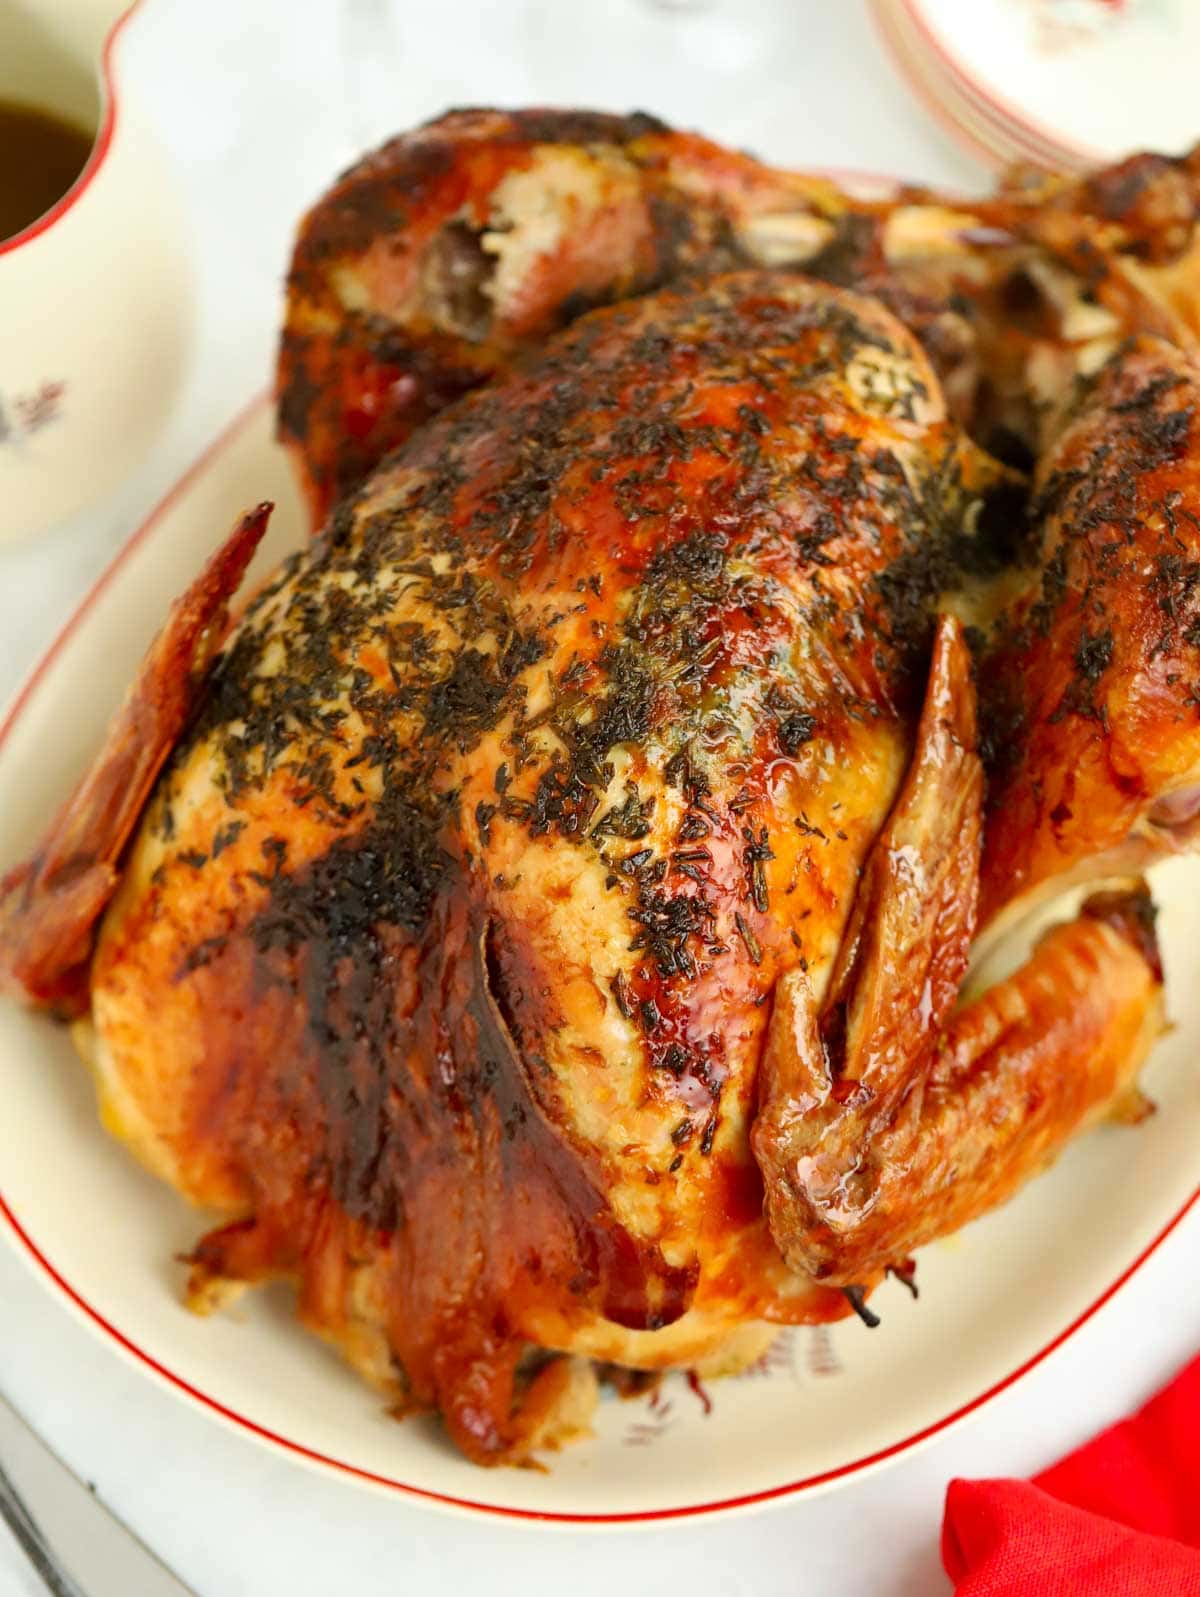
This is the secret to avoiding dry turkey. There are many weird and wonderful methods out there that people swear by for keeping that meat tender and moist(!), but we’re not bathing our turkey for a week here. A simple, flavoured compound butter mix made with herbs and zest, lathered underneath the skin before you cook it, is all that’s required.
Bacon
As well as the butter, streaky bacon rashers are the only extras I think a roast turkey needs to stay juicy, but it also adds flavour. By the time the bird has cooked, the bacon will be hard. You can always discard it if you like, but we always eat it crumbled over the meat!
Size
Understanding what size turkey to buy for the amount of guests you have is important so that you’re not selling anyone short or you don’t have a crazy amount of leftovers (if that’s even possible).
It’s also crucial to know the size so you know how long to cook your turkey for, because different weights require different times in the oven. We’ll outline this in more depth further down.
Temperature
This is also a key component to getting your turkey just right, so it’s not undercooked or drying out. I cook turkey at 180℃, but the best thing to do is invest in a meat thermometer so you don’t have to guess how the bird is doing.
I recommend this Thermapen thermometer. I have had lots that have broken, and while this isn’t the cheapest option, it’s the only one that’s lasted and has been consistently reliable.
Basting
This just means spooning some of the fat that’s coming out into the tray over the meat. Do this every hour or so (or whenever you are passing the oven).
This helps to stop it from drying out. Be aware that if you open the oven often, the turkey may take longer to cook though, as the heat escapes.
Resting
This is a really important part of the whole process because the meat carries on cooking while it’s resting (its temperature rises at about another 10℃ in this time). It also adds extra flavour and juiciness during this time, as well as gives you time and space for the rest of the cooking.
Time for resting should be roughly 1.5 hours for a 4-5kg turkey, up to about 2 hours for 6-10kg.
Carving
Decide on how you’ll do this beforehand. Ceremoniously at the Christmas dinner table might be your dream scenario, but think about how you’ll go about it before it’s crunch time so you can get organised and have a carving dish and knife ready!
Follow my No Stress Christmas Dinner Plan here for organising the rest of your meal!
Ingredients for a Christmas turkey
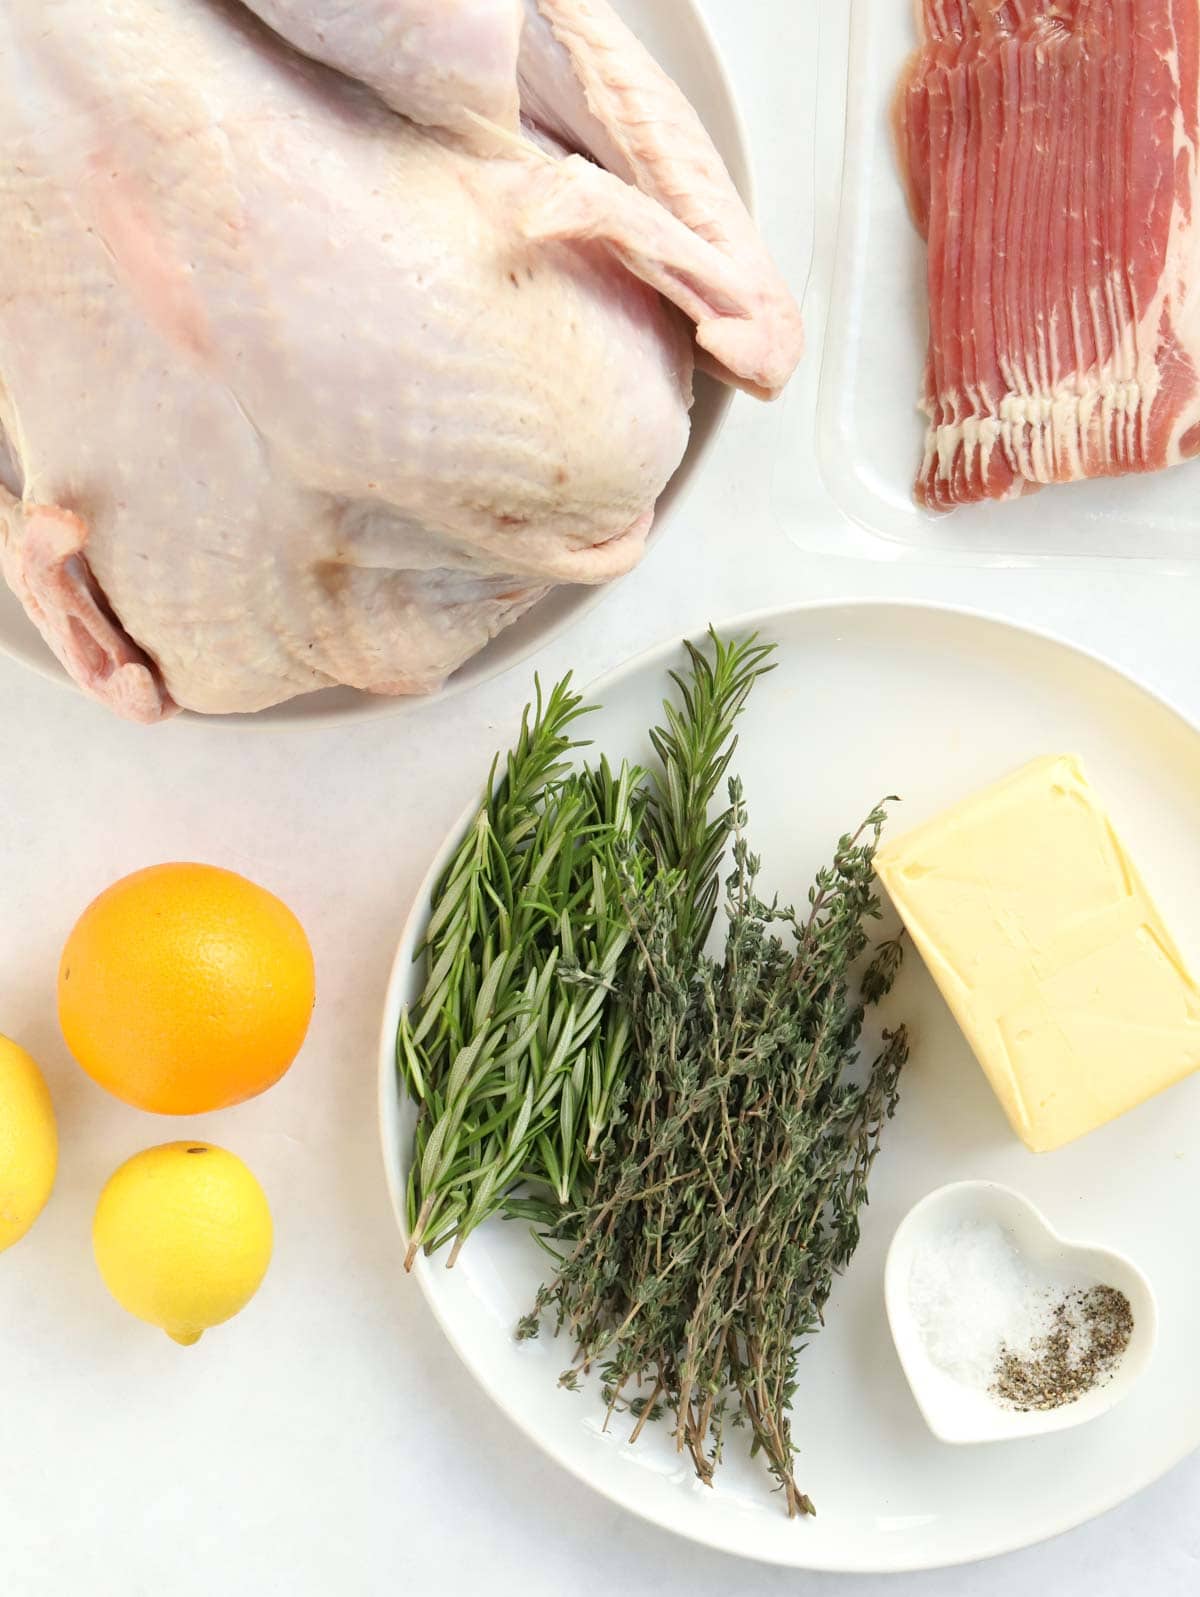
- Turkey – Whole bird or crown.
- Smoked streaky bacon
- Salted butter – At room temperature.
- Fresh thyme & rosemary – Leaves need to be removed from the stalks and finely chopped.
- Lemons and an orange – For the zest.
- Sea salt and black pepper – Plenty of seasoning.
How to make a Christmas turkey
1. Remove the turkey from the fridge. Put your butter ingredients into a bowl and mash together well (as per the full recipe below).
2. Remove any giblets from the inside of the chicken (if yours came with them in) and pat the turkey dry with kitchen roll. Part the skin from the breasts on both sides.
3. Push half of the butter under the skin evenly. Spread the rest over the top of the skin.
4. Lay the bacon rashers carefully over the turkey breast. Cover with foil and cook.
TURKEY BIRD VS CROWN
Which type to buy depends on your personal choice and circumstances, like how big your oven is, how many guests you are cooking for and what your budget is.
A whole bird is a classic centrepiece that’s traditional and looks the part. It also offers a variety of meat and can feed plenty of people at once, so is therefore more economical (but probably costs more to buy). It also comes with a bit more work, faff and mess.
A turkey crown is probably less hassle and easier to carve. It’s a good option if you’re not feeding many people or those you are feeding mainly prefer the white meat of the bird. It will also cook quicker and is good if you don’t have much room in your oven. It is cheaper and there’s little waste (but not as many leftovers), and there is an argument that it’s not quite as succulent without the legs and wings.
If you go for this option, follow my Easy Turkey Crown recipe here.
Top tips
What size turkey to buy
- The smallest you can buy – about 2kg – will feed about 4-6 diners
- The next sizes up – between 3-4kg – will feed about 6-8 people
According to Copas Turkeys, the bigger birds rations are as follows:
- 4kg serves 8-10 people
- 5kg serves 10-12 people
- 6kg serves 12-14 people
- 7kg serves 14-16 people
- 8kg serves 16-8 people
- 9kg serves 18-20 people
Cooking time
Weigh the turkey first so you get your timings correct. Preheat the oven to 180℃.
According to the Food Standards Agency, you should cook your turkey by these guidelines:
- Allow 45 minutes per kg plus 20 minutes for turkey under 4.5kg
- Allow 40 minutes per kg for between 4.5-6.5kg
- Allow 35 minutes per kg for over 6.5kg
Temperature
Use your meat thermometer to gauge whether your turkey is cooked or not. Always check the thickest part of the meat (usually the thigh). It will be ready when its temperature is recorded at either:
- At 65°C for 10 minutes
- At 70°C for 2 minutes
- At 75°C for 30 seconds
Preparing in advance
Prep up to the end of step 3 up to 24 hours before you’re ready to cook the turkey. Cover and chill it overnight, then cook as normal in the morning. A fridge-cold turkey may take a little longer to cook than a room temperature one.
Thawing a frozen turkey
Plan this WELL in advance! Turkeys are hefty birds and take some thawing out – large ones can take up to 5 days! If you are cooking a frozen turkey, check the packet instructions beforehand, however most do need to be defrosted.
According to official guidance from the Food Standards Agency, you should always defrost your turkey in a fridge rather than room temperature. You’ll need to put it in a container in case any liquid comes out to avoid cross-contamination (and a messy fridge!)
If you don’t have thawing instructions, allow about 10-12 hours per kg for a complete thaw.
Room temperature
Remove the turkey from the fridge and leave it at room temperature for about an hour before you’re going to cook it. This stops it from reacting and shrinking in the hot oven.
Take out the giblets
These are basically the innards of the turkey and they’re usually inside the bird in a bag, so you just need to pop them out. You don’t need them for your turkey, but they’re great for additional flavour in your gravy if you want to go the extra mile.
How to rest your turkey
When the turkey is cooked through do the following:
- Remove from the oven but leave in its tray (lots of juice will come out)
- Put it on the side somewhere not too chilly in the kitchen
- Keep the tin foil covering
- Pop a clean bath towel or a couple of clean tea towels on top of the tin foil to seal and keep the heat in
- Let it rest for about an hour
- When you’re ready to serve, pour the juices into your gravy (if you wish)
- Put on a platter and carve
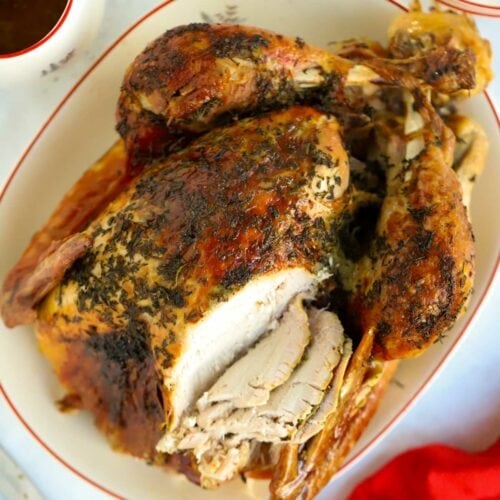
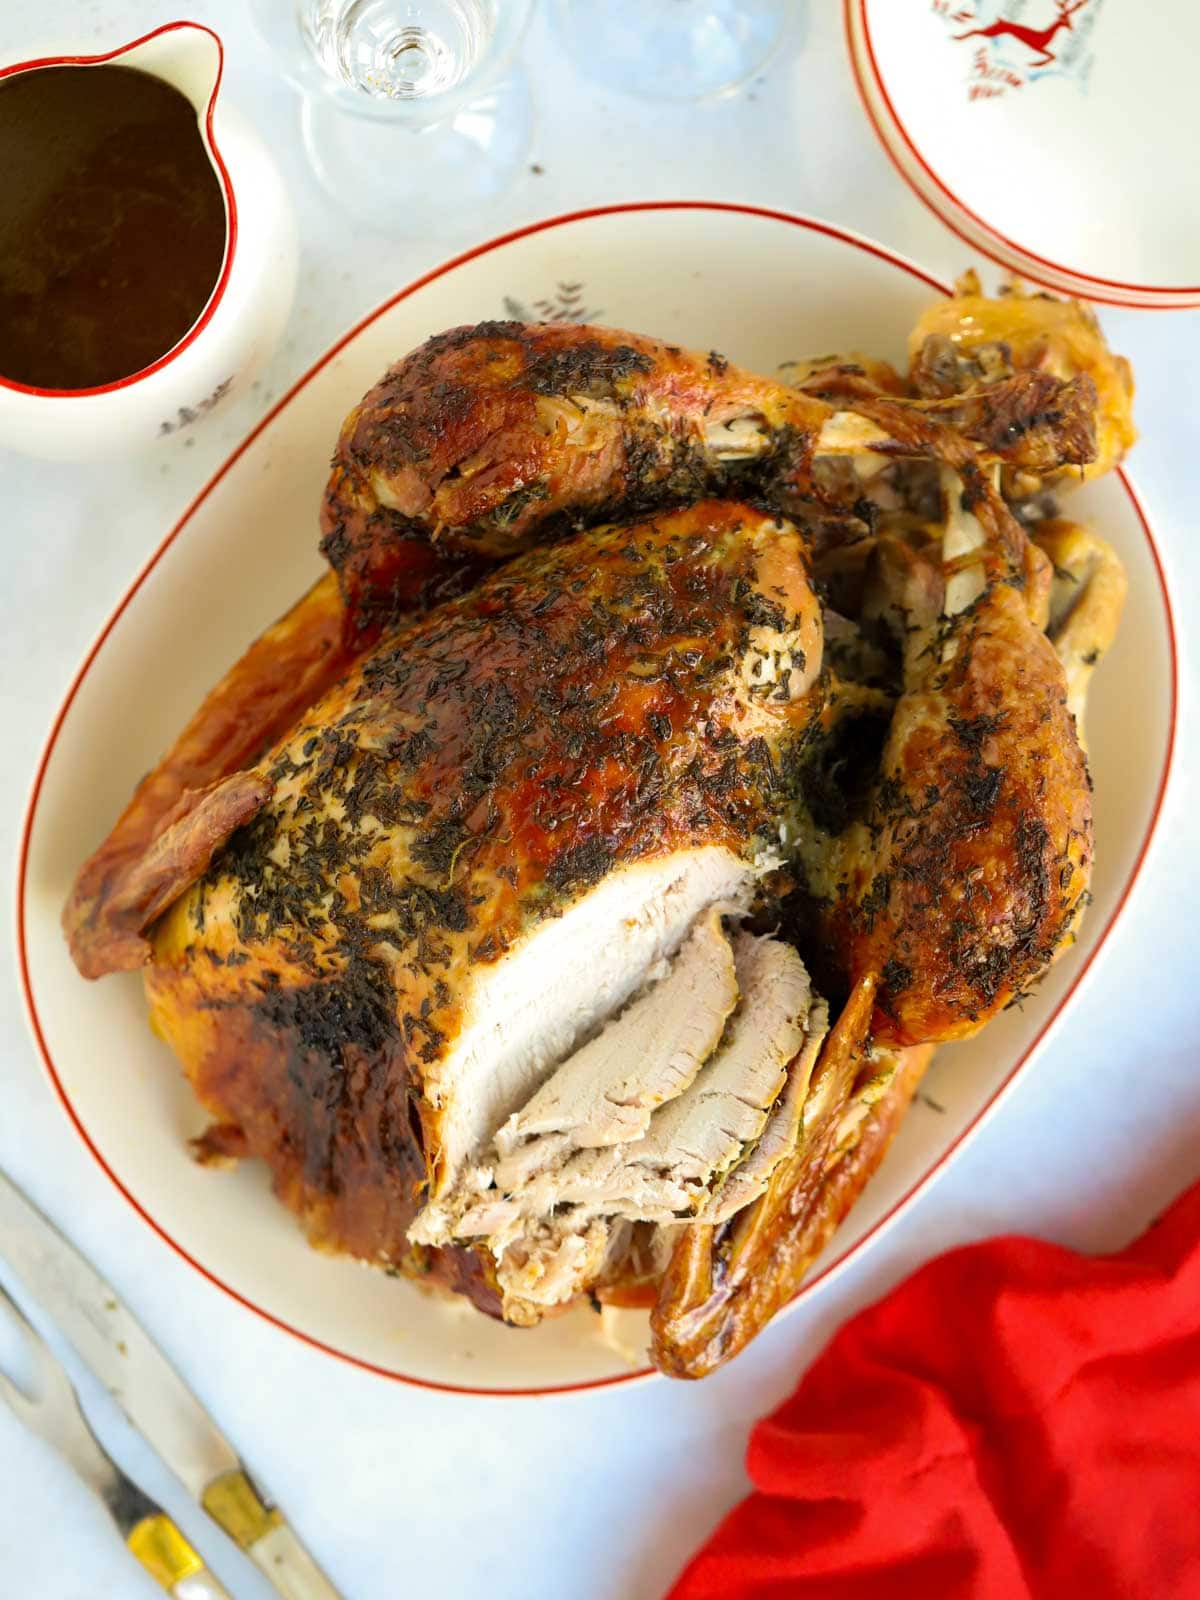
Carving
You can either carve it the traditional way, which is to remove the legs and wings and carve along the grain of the breast. OR you can remove the breasts by cutting them out of the carcass in one whole piece and slicing it on a board.
Start on one side of the breast and cut downwards diagonally until you reach the centre. For the legs and wings, carve the meat until you get to the joint, then put your thumb in the gap and pull the joint away.
Get my Christmas cookbook!
This recipe is straight out of my ‘What’s For Christmas Dinner?’ book.
FAQs
Make sure your turkey is steaming hot and cooked all the way through. If you don’t have a meat thermometer, cut into the thickest part of the meat, check that none of the meat is pink and that any juices run clear.
If you do have a thermometer, read above for ideal temperatures.
This is simply a way of coating the meat with its own juices every now and then to ensure it stays juicy. Spoon the liquid at the bottom of the oven tray every hour or so over the turkey.
There are so many ways to make leftovers from your turkey, but at this time of year I just love to keep it really simple and easy. My perfect go-to recipe is my Turkey Curry leftovers recipe.
Always follow the guidance from the Food Standards Agency by putting leftover food in the fridge or freezer within 1 to 2 hours.
This used to be something people did a lot, but not as much now. Mainly because it stops the turkey from cooking properly all the way through and stuffing can be made just as delicious on its own.
I like to cook covered in tin foil in the oven, to make sure that the bird is not cooking too quickly. If an hour before the end of the cooking time you feel that the outside of the turkey and/or the bacon isn’t crispy, take the foil off to allow a crispy finish on the outside.
Then cover after it’s cooked to keep it warm and allow the meat to cook a little longer in its own juices, releasing flavour and finishing off nicely under a bed of foil and towels!
There are different variations from household to household, but stick to these classic side dishes and you won’t go far wrong!…
Roast Potatoes
Carrots & Parsnips
Brussels Sprouts
Red Cabbage
Stuffing
Cauliflower Cheese
Pigs in Blankets (mini sausages wrapped in bacon!)
Gravy
Cranberry Sauce
Ever the trend setter, it was Queen Victoria serving it for Christmas in 1851 (alongside goose and beef) that made it the meat of choice for our Christmas Day feast from then on.
Let me know how you got on and what you thought of these recipes. Please rate the recipe using the ⭐️ below.
Also I’d LOVE to see your cooking creations. If you’d like to share yours with me, you can tag me on Instagram (@tamingtwins).
No Fuss Roast Turkey {with Easy Herb Butter}
Ingredients
- 4 kg Whole turkey or turkey crown
- 250 g Smoked streaky bacon
For the Herb Butter:
- 250 g Salted butter, At room temperature
- 20 g Fresh thyme, Leaves removed from stalks and finely chopped
- 20 g Fresh rosemary, Leaves removed from stalks and finely chopped
- 2 Lemons, Zested
- 1 Orange, Zested
- Plenty of sea salt and black pepper
Instructions
- Remove the turkey from the fridge and set aside. Put the herb butter ingredients in a bowl and mash together well.
- Remove the giblets (if your turkey has them) and put the turkey into a well-lined roasting tin or a foil tray placed on a baking tray (to support it). Pat the turkey dry with kitchen roll, then use a small sharp knife to gently part the skin from the breasts at the highest point. Using a clean hand, separate the skin from the meat. Repeat on the other side of the bird too.
- Push about half of the herb butter under the skin of the turkey. You can use your hands on top of the skin to help push it down. Spread the rest of the butter over the top of the skin. Lay the bacon rashers carefully over the turkey breast (I like to criss-cross them as this helps to stop them falling off as they cook). Cover loosely with tin foil.
- When you're ready to cook, preheat the oven to 180℃ fan/200℃/Gas Mark 6 and cook according to the timings above (or on the turkey packaging), basing the cooking time on its weight.
- Baste the turkey every hour or so. If, an hour before the end of the cooking time, the outside of the turkey or the bacon are not turning brown, remove the foil to allow for a crispy finish.
- When the turkey is cooked through, remove it from the oven but leave it in its tray (lots of juices will come out). Set aside somewhere not too chilly in the kitchen and keep it covered with foil. Pop a clean bath towel or a couple of clean tea towels on top of the foil to keep the heat in and let it rest for about 1 hour.
- When you're ready to serve, pour the resting juices from the tray into your gravy (if you wish). Place the turkey on a platter and carve.
Did you make this recipe? Click here to let us know how it went and give it a ⭐️ rating! Your feedback helps us to make more recipes you really want.
Notes
- 4kg serves 8-10 people
- 5kg serves 10-12 people
- 6kg serves 12-14 people
- 7kg serves 14-16 people
- 8kg serves 16-8 people
- 9kg serves 18-20 people
- Allow 45 minutes per kg plus 20 minutes for turkey under 4.5kg
- Allow 40 minutes per kg for between 4.5-6.5kg
- Allow 35 minutes per kg for over 6.5kg
- At 65°C for 10 minutes
- At 70°C for 2 minutes
- At 75°C for 30 seconds
- Remove from the oven but leave in its tray (lots of juice will come out)
- Put it on the side somewhere not too chilly in the kitchen
- Keep the tin foil covering
- Pop a clean bath towel or a couple of clean tea towels on top of the tin foil to seal and keep the heat in.
- When you’re ready to serve, pour the juices into your gravy (if you wish)
- Put on a platter and carve.
Nutrition
Nutrition information is automatically calculated, so should only be used as an approximation. Nutritional values are per portion unless otherwise stated.
This recipe was first published here on December 4th, 2022. It was updated again on November 6th, 2025 to add additional step-by-step videos.
This post was originally published on November 6, 2025 and updated later to make improvements.


Cooking a turkey is always a source of stress, not wanting it to be dry, having lots of flavour etc. I followed the recipe almost completely. I didn’t have an orange and I added a bit of garlic to the herb butter. This will now be the way I always cook the Christmas Turkey!!
Sarah, thank you so much for this recipe. I’ve cooked a ready prepared crown but this is the first time I’ve ever cooked a turkey and I was nervous but I followed the recipe (used dried herbs instead of fresh and back bacon instead of streaky) but it was delicious! My husband hadn’t wanted turkey as he finds it too dry but this one was delicious and enjoyed by the whole family. I also followed your recipes for the red cabbage (slow cooker) the roast spuds , the sprouts and the parsnips and carrots and it was a hassle free Xmas lunch that was on the table at the planned time! So pleased- thanks again!!
This is the first time my turkey hadn’t been dry ! Thank you. And so tasty with the herbed butter. Will do thi every year
I followed this method for a Turkey crown and the result was fantastic. The most delicious and succulent Turkey we have ever eaten. Thank you Sarah! This will definitely be my ‘go to’ method for cooking Turkey in future.
The best a turkey has ever come out. 100% recommend, the compound butter meant I didn’t even have to regularly baste, so could go about my day whilst it did it’s thing in the oven. So moist and flavoursome.
Great tips. Thank you. Will be following this.