This post may contain affiliate links.
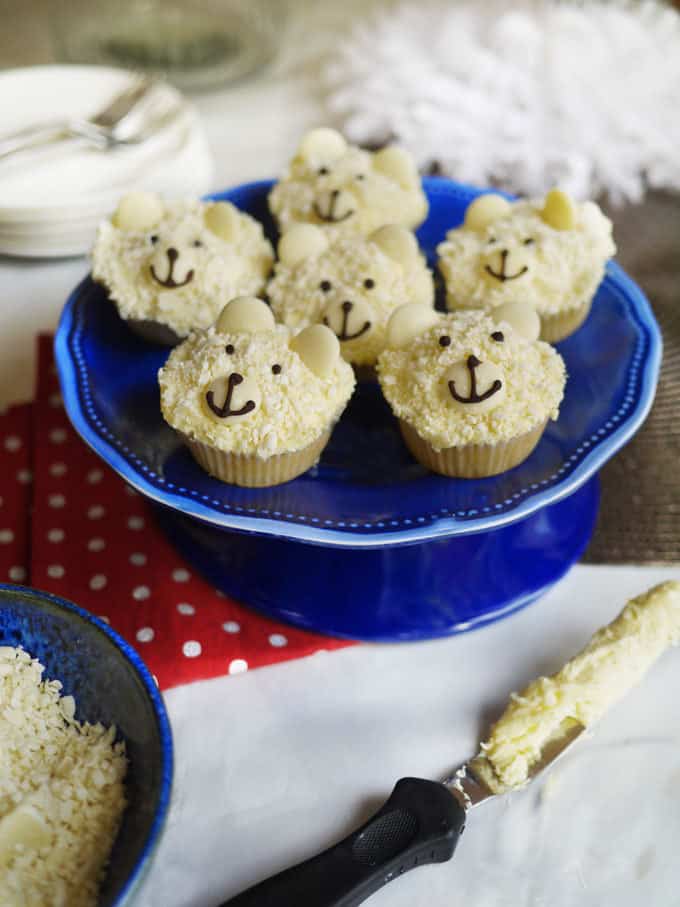
These cute Polar Bear Cupcakes are fun and easy to make with the kids at Christmas. With creamy white chocolate and an uber cheat method, they’re perfect for gifting, bake sales or a treat to enjoy at home.

Would you look at these cupcakes? Seriously, don’t you just want to BITE THEIR LITTLE POLAR BEAR CUPCAKE EARS OFF, they are that cute?!
I’m always short on time at Christmas, but festive baking is one of my favourite parts of the season.
These easy Polar Bear Cupcakes are a great compromise as they are super quick to decorate and you can make everything from scratch, or cheat and buy the components ready-made and just assemble them (no judgement here, the juggle at Christmas is epic).
They are for festive baking with the kids, but look impressive enough for adults and children if you want to gift or donate them.
Why you’ll love this Polar Bear Cupcake recipe
⭐️ Quick, easy and FUN to make
⭐️ Really cute and ideal for gifting
⭐️ A festive activity for families
Polar Bear Cupcake Ingredients Notes
- Cupcakes – Yes, you read that right. We’re really just decorating 12 ready-made cupcakes or fairy cakes here (this is a public service announcement that it is allowed to make things easier for yourself). Of course, you could also make your own. Follow my homemade cupcake recipe here (just leave out the cocoa)
- Ready-made buttercream icing – You’ll need a 400g/14oz tub for this recipe, or of course, make your own cream cheese icing with this recipe
- White chocolate – 200g/7oz grated for the face and white chocolate buttons for the eyes. I used my favourite Callebaut chocolate for this recipe. This chocolate is just amazing, it melts so well and really makes a difference to any recipe. When you buy it in bulk (1kg bags at a time) from Amazon it works out to about the same price as supermarket chocolate. A good investment I think as it really does make SUCH a difference
- Chocolate icing pen – This is for drawing on the bear’s face. You can find this from the cake decorating aisle in supermarkets
How to make Polar Bear Cupcakes
- Buy your favourite ready-made plain cupcakes without a topping.
- Grate or blitz the white chocolate up in the food processor.
- Coat the top of your cupcakes generously in icing using a palette knife.
- Roll each one in the grate chocolate, then decorate the face with buttons and your icing pen to create your polar bear face.
See below for full recipe.
Substitutes
To make gluten free or dairy free – Make sure you use the appropriate cakes and chocolate and check the ingredients of the icing and chocolate icing pen
Storing
Store these in an airtight container that ISN’T plastic, somewhere cool (so usually dark too) but not a fridge.
You may find that if you store them on a hot day or in a plastic container, the cupcake cases come away a little from the cakes. They should last 3-4 days in an airtight tin.
More easy Christmas bakes…
Sweet Things
Christmas Rocky Road {Easy Recipe}
Sweet Things
Christmas Cupcakes {Easy Recipe}
Sweet Things
Snowball Chocolate Truffles {Easy Recipe}

Sweet Things
Baileys Fudge {Quick & Easy Recipe}
Let me know how you got on and what you thought of these recipes. Please rate the recipe using the ⭐️ below.
Also I’d LOVE to see your cooking creations. If you’d like to share yours with me, you can tag me on Instagram (@tamingtwins).

Polar Bear Cupcakes {Very Easy Recipe!}
Ingredients
- 12 Ready-made cupcakes or fairy cakes, Or homemade
- 400 g (14 oz) Ready-made buttercream icing, Or homemade
- 200 g (7 oz) White chocolate
- 36 White chocolate buttons
- Chocolate icing pen
Instructions
- Grate your white chocolate or blitz it in the food processor to create fine flakes.
- Take a cupcake and coat the top completely in the icing using a palette knife.
- Roll the cupcake around, icing side down, into the grated chocolate.
- Decorate with chocolate buttons and the icing writing pen to give your polar bear a face.
Did you make this recipe? Click here to let us know how it went and give it a ⭐️ rating! Your feedback helps us to make more recipes you really want.
Notes
Nutrition
Nutrition information is automatically calculated, so should only be used as an approximation. Nutritional values are per portion unless otherwise stated.
This post was originally published on November 20, 2015 and updated later to make improvements.


Good
So simple but so cute! I love these. We will definitely be having a go at making them! Thanks for sharing 🙂 #Sharewithme