This post may contain affiliate links.
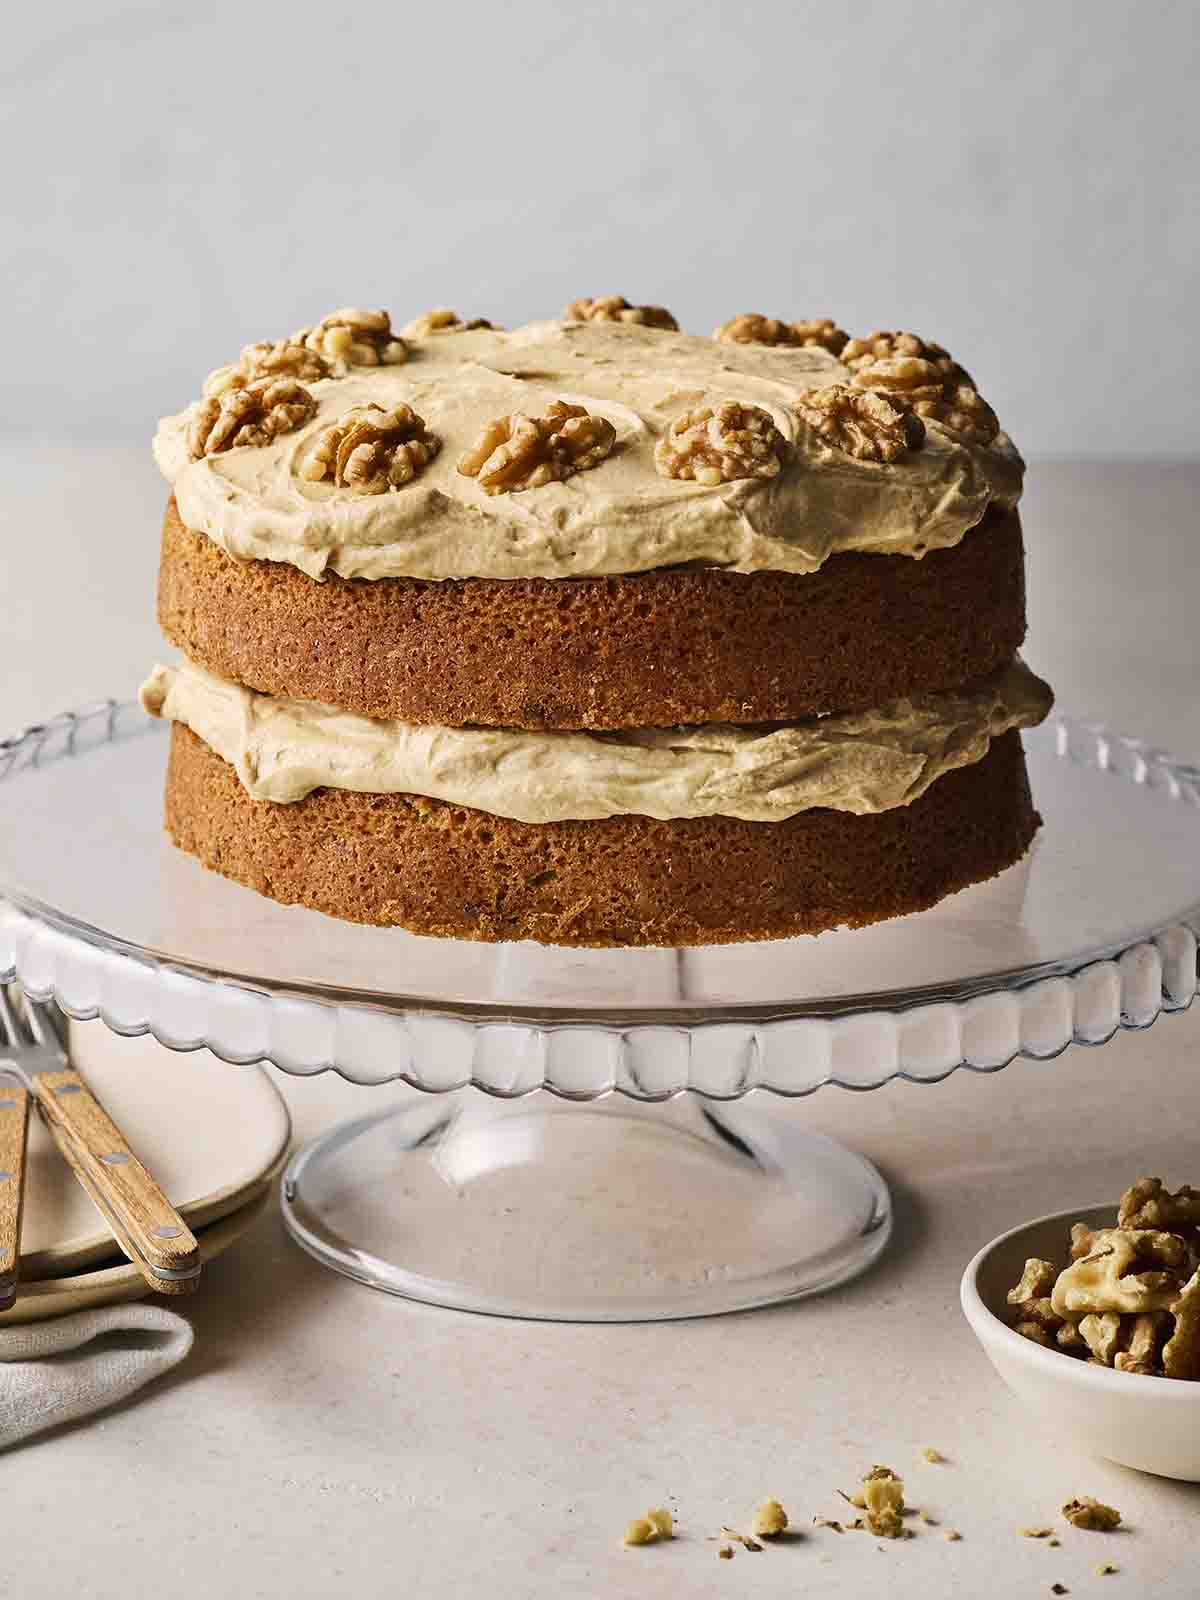
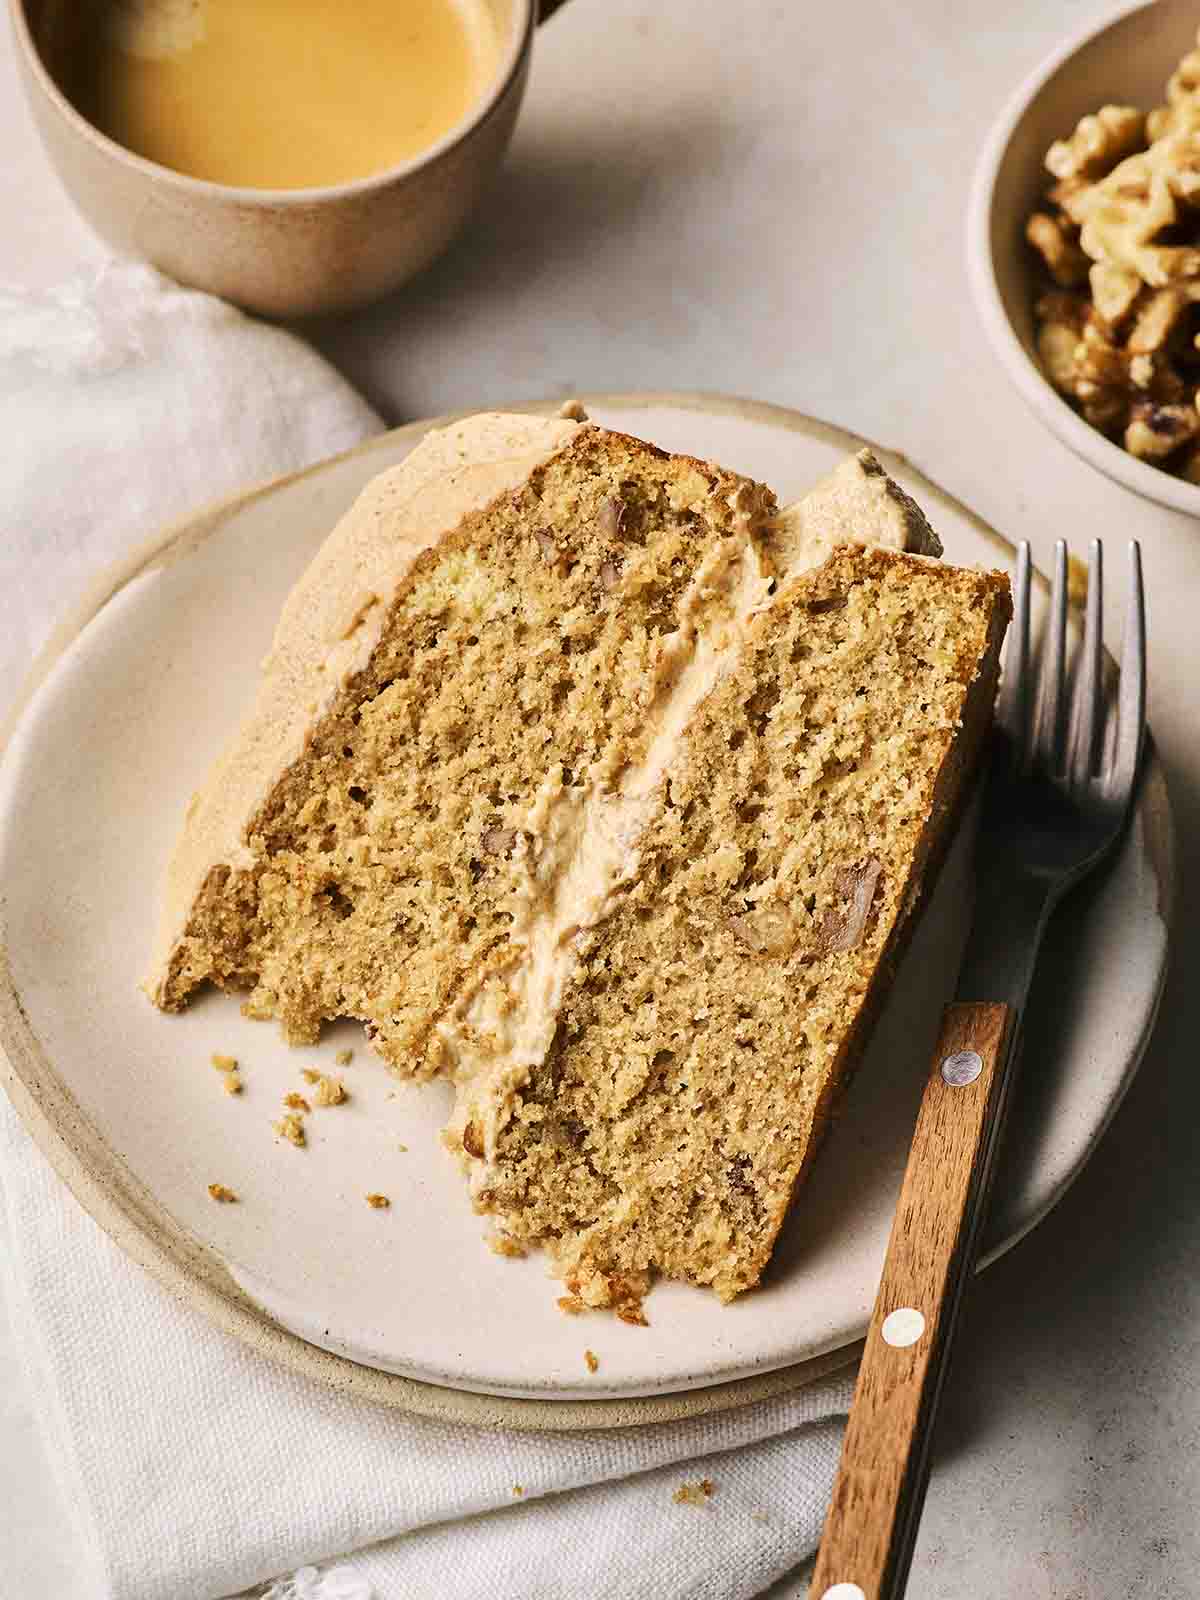
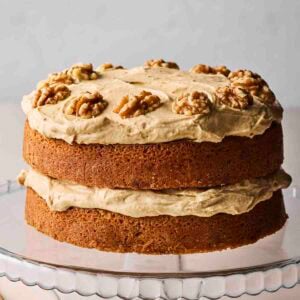
Coffee and Walnut Cake is a classic. It looks so impressive but is really easy to make. This is your foolproof recipe that gets you moist, light and fluffy sponge and delicious flavour, every time.
This Coffee and Walnut Cake has been tested and tested to make sure it’s totally reliable, so all you have to do is get your apron on, follow the instructions and be star baker..
I’ve been making this exact recipe for so many years, I can’t believe it’s taken me this long to share it (was I secretly saving it just for myself? I’ll never confess! 😆)
Traditional Coffee and Walnut is one of my absolute fave cake recipes, and this one has just the right amount ofcoffee flavour, nutty crunch and creamy buttercream icing.
Why you’ll love this Easy Coffee and Walnut Cake recipe
⭐️ Moist, light and fluffy, every time
⭐️ A quintessential British cake for all occasions
⭐️ Impressive but easy to make
Coffee and Walnut Cake Ingredients
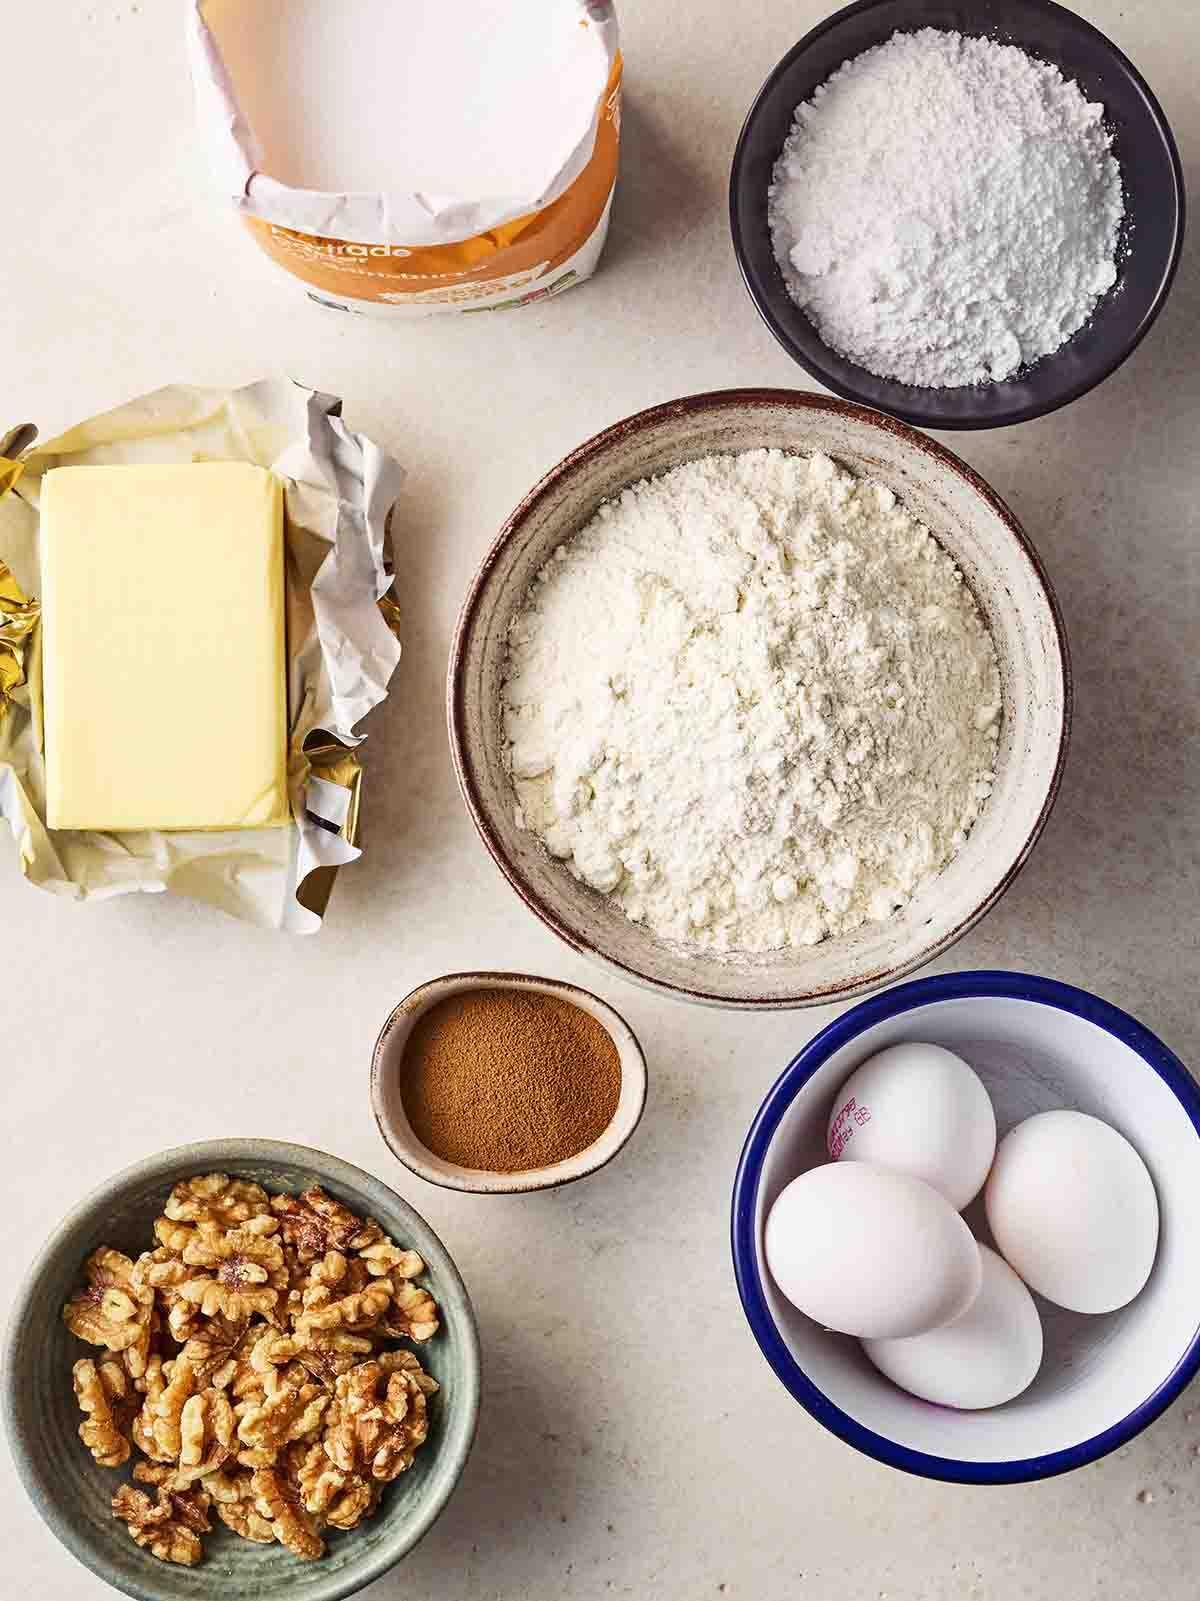
- Butter – This should be unsalted and at room temperature. You’ll need extra for greasing the cake tins with too.
- Caster sugar – This is finer than granulated sugar, and if you’re outside of the UK may be called superfine, bar or baker’s sugar.
- Eggs – You’ll need medium eggs for this recipe. I use free-range.
- Self-raising flour – This flour contains a raising agent so there’s no need for baking powder too.
- Coffee – You’ll need instant coffee here.
- Walnuts – Buy ready-chopped pieces or roughly chop them yourself for the ones that go into the cake batter. Halved walnuts look better on top for decoration.
- Icing sugar – This is for the icing that will sandwich between your sponge layers, and go on top of the cake to decorate.
How to make Coffee & walnut CAke
1. Cream the butter and sugar, then add the eggs one at a time.
2. Mix in the flour, coffee, water and walnuts, then spoon the mixture into your tins. Bake as per the recipe below.
3. Meanwhile, make your icing by beating the butter and icing sugar, then mixing in the coffee.
4. Sandwich your baked cake together with buttercream when completely cold, then decorate the top.
Storing
Homemade Coffee & Walnut Cake will last 3 days in an airtight container. There’s no need to refrigerate.
If you want to make this ahead of time, bake the cakes, cool them in the tin, turn them out and wrap them tightly in two layers of cling film (leaving the baking paper on). You can then store them for 3-4 days, adding the icing and toppings before serving.
It will be fine if you add the filling and store it for 3 days, but the tip above is for absolutely optimal results!
Freezing
If you’d like to freeze your Coffee and Walnut Cake, do so BEFORE filling it. Follow the above steps for wrapping the cake layers before putting them into the freezer. Defrost thoroughly before you fill it with icing and add your icing and walnuts on top.
Recipe Tips
✅ Use an electric hand whisk for the sponge.
✅ Use 7″ round sandwich tins that have removable bases for your two layers of sponge. I like these ones.
✅ Grease the tin very well with butter and line the base with baking paper or parchment like this one.
✅ Allow cooling time to your method in the recipe below. The sponge layers should be filled and topped when they’re completely cold.
✅ When I smooth the mixture out in the tins, I make a very slight dip in the centre of each one. This compensates for the cake rising and means that they are much easier to stack on top of each other.
More easy Cake Recipes…

FAQs
It depends how big you like your slices! Generally though, this makes 12 average slices.
Yes, it a classic British cake that came to prominence in 1934 thanks to an advert for self-raising flour by the brand McDougalls.
Its popularity is still going strong today, and it can be found in bake sales, village fêtes or tea rooms all over the UK. And is still loved by home bakers!
Let me know how you got on and what you thought of these recipes. Please rate the recipe using the ⭐️ below.
Also I’d LOVE to see your cooking creations. If you’d like to share yours with me, you can tag me on Instagram (@tamingtwins).
Coffee and Walnut Cake {Foolproof Recipe!}
Ingredients
For the cake:
- 225 g Unsalted butter, At room temperature | Plus extra for greasing
- 225 g Caster sugar
- 4 Eggs, Medium, free range
- 225 g Self-raising flour
- 3 tsp Instant coffee, Dissolved into 50ml of boiling water
- 100 g Walnuts, Roughly chopped
For the decoration:
- 175 g Unsalted butter, At room temperature
- 300 g Icing sugar
- 3 tsp Instant coffee, Dissolved into 30ml boiling water
- 50 g Walnut halves
Instructions
- Preheat the oven to 180℃ fan/200℃/Gas Mark 6.
- Grease 2 x 7" round sandwich tins with butter and line the bases with baking paper or baking parchment.
- Cream your butter and sugar until it’s pale, light and fluffy. Use an electric hand mixer if you have one.
- Mix in the eggs, one at a time, beating really well after each egg. Don’t worry if it starts to look a bit curdled, it’ll all come together.
- Mix in your flour. If you’ve been using a mixer, do this bit by hand. It helps to keep the sponge light.
- Stir in the coffee and water mixture along with the chopped walnuts.
- Spoon into your tins and smooth out with the back of a spoon. Make a bit of a dip in the middle of each sponge to account for rising and keep them level.
- Bake for 25 – 35 minutes or until a skewer comes out clean. Allow the cakes to cool in the tins for 5 minutes. Remove from their tins and allow to cool completely.
- Meanwhile, make your icing. Beat your butter until it's pale, light and fluffy.
- Beat in your icing sugar. Stir in your coffee mixture. (It should be light and fluffy.)
- When your cakes are completely cold, sandwich each layer together with your buttercream, and a layer on top. Pipe some decoration on top if you have a piping bag, before decorating with walnut halves.
Did you make this recipe? Click here to let us know how it went and give it a ⭐️ rating! Your feedback helps us to make more recipes you really want.
Notes
Nutrition
Nutrition information is automatically calculated, so should only be used as an approximation. Nutritional values are per portion unless otherwise stated.
This post was originally published on May 28, 2025 and updated later to make improvements.


Great recipe. I used 2 8″ tins and espresso coffee from my machine but it still turned out well.
Just made it …waiting for it to cool before sandwiching it together…looks nice though 😋
Hi Sarah
I love ALL your recipes !
Can I ask if I can use this recipes for muffins instead ? If so, How long in the oven at 180 degrees C ?
And if I can substitute the walnuts (my daughter is severely allergic to all nuts) with chocolate chips please ?
Kind regards
Ravi S
Hi Ravi, we’ve not tested these as muffins but other muffins recipes on the site are around 15-20mins so you could try that time? I am also allergic to nuts and I love the tiramisu cake which has a coffee flavoured sponge, you could try that instead? The choclate cupcakes are also good.
Another absolutely delicious recipe. I used 1 9” cake tin as I didn’t have 2x 7” and just cut in half. Baking time 40-45 mins instead. We’re also gluten free so added 1/4 xantham gum from crumb structure. Plus used espresso shot from our coffee machine rather than instant coffee to get extra strong coffee flavour (which we prefer!) it was perfect!
I made this cake for my mam for Mother’s Day. Great recipe, so easy to follow. Thank you for sharing! X
recipe worked perfectly
Brilliant recipe, thanks so much. I made it today for my husband’s birthday as it’s his favourite flavour cake. I was nervous as I hadn’t made it before and it’s his go to flavour in any cake shop/restaurant so I knew it had to be just right… and it was!
This cake was delicious I made it a couple of years ago but I can’t remember which brand of coffee is best. Could you recommend one? Thank you
Hi Jess, whatever coffee you use at home will be fine!
Great recipe. I used 2 8″ tins and espresso coffee from my machine but it still turned out well.